Sketching a Graph From a Video – Dan Meyer’s Task

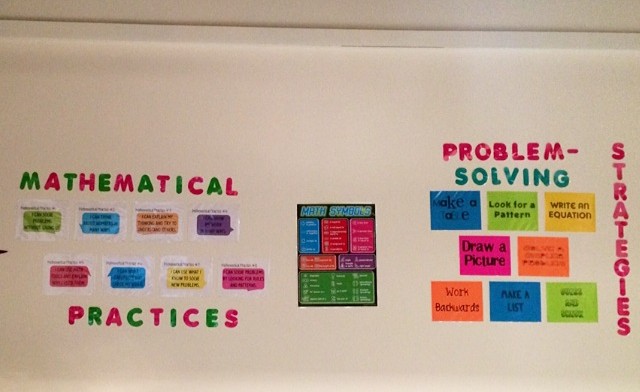
I recently taught standard 8.F.5, part of which states that students should be able sketch a graph that exhibits the qualitative features of a function that has been described verbally. As an extension of sketching graphs, one of my colleagues taught a lesson on graphing based on 15-second videos. She told me about Dan Meyer’s Graphing Stories, which provides 22 15-second real-life video stories in real time and half time while a seconds-counter ticks. The end of each video shows the sketching of a graph that matches the scenario as the scenario plays in the background.

I showed the story in real time to my students and asked them to sketch what they thought the graph would look like. I then played the story in slow-motion two or three times so that students could observe details in the videos and what time they occurred. Students then sketched the graph again, improving on their original sketch. With a quick Turn and Talk, students shared their graphs with each other and why they sketched them the way they did, making connections with what happened in the video. We then came together as a whole class to discuss some student sketches and compare them with the graph the video provided.

The graphs provided in the videos were not perfect, which is ok because they were supposed to be sketches, and prompted some nice discussions. In the Weight of Cups video (decreasing) there was a point at which the cups were stuck together and when the person tried removing one cup from the stack on the scale, the stack of cups come up off the scale, affecting the weight reading. In a split second, the weight of the cups on the scale decreased because the stack was lifted off the scale. A couple of my students noticed this and reflected it in their graphs. They pointed out in the graph provided in the video that the decrease in weight at that time interval was not reflected in the graph.

Sketching a graph from a video was quite challenging for my students, as expected, but I was happy with the observations students made in the videos and the discourse they had about how to show that in their graphs. This lesson also worked well with one of my classes in which I am really working on student motivation and engagement. The first couple videos take a while to show, discuss, and sketch for, but students soon get the hang of watching the video and the stopwatch at the same time. In about 30 minutes, my classes got through about three videos. There are some really cool videos on the site, so I will probably keep going back to this activity and present a couple more to my class, maybe on half days or days that are interrupted with field trips and other events.

Mathematics Assessment Resource Service (MARS)

With the longer periods I have to teach this year, I’ve been interested in using lessons and tasks from the Mathematics Assessment Resource Service (MARS). The Mathematics Assessment Project provides lessons, tasks, and tests for middle school and high school classes, which can be filtered through using the grade, Standards for Mathematical Practice, or Mathematics Common Core State Standards. The lesson plans provided are very detailed and provide materials for a warm up, activity, and formative assessment. Lesson plans also offer anticipated student misconceptions and questions or prompts to address them. I’ve only used a handful of the lessons so far but have found them to be effective in teaching certain concepts, getting students motivated and engaged in the lesson, and promoting student use of mathematical reasoning to justify or disprove a claim, which fosters more mathematical discourse in my classroom. Check out the MARS lessons for yourself!

So far in my 8th grade classes, I have used Interpreting Distance-Time GraphsSolving Linear Equations in One Variable, and Representing and Combining Transformations and plan to use Classifying Solutions to Systems of Equations when I get to the unit on solving systems.

Aha! Moment – Toothpick Staircase Problem

(Note: My last blog post discussed a two and half hour first class with my B/C students. The way the schedule is set up, I also see the B/C class the next day in the cycle for two and a half hours. This post is based on my lesson with the B/C class for two and a half hours on the second day of school.)

One of the most awesome moments of my second year teaching 8th grade math at Breed so far was on the second day of school!

The Math Department at my school read Fostering Algebraic Thinking by Mark Driscoll last year, in which Driscoll presented the Toothpick Staircase. Students were asked to determine a rule for the number of perimeter toothpicks in the nth staircase, and later, for the number of total toothpicks in the nth staircase. Groups of four students worked on the problem in a tabletop, in which each group member showed their work and contribution to the problem on a corner of a large piece of grid paper using different colored markers.

Students quickly saw the pattern in perimeter toothpicks, although they struggled to explain the pattern accurately both verbally and symbolically, but eventually got there with the help of some probing questions. Groups that found the rule for the number of perimeter toothpicks were asked to complete the extension questions regarding the number of total toothpicks. It was more challenging for students to recognize a pattern in the number of total toothpicks, and even more difficult to represent it mathematically. One group had gotten far enough to recognize a pattern but was stuck on how to express it as a rule.

I spent a few minutes before the class reminding myself of the problem and trying to determine the rule for the number of total toothpicks, and in the short time I had, I just could not come up with the rule. I’m not sure why. Maybe it was because this was the second day of the school, the first math lesson I was doing with the class, and I was nervous and anxious with a few minutes to spare before the morning bell rang. Maybe I just simply didn’t “see it”. When I went over to the group that had gotten to the total toothpicks question, I was pretty surprised and a bit nervous because they needed help in expressing the rule, but I hadn’t even found the rule myself, so how was I supposed to probe them?! I took a look at what they had so far; they had recorded on the given diagram of the first three staircases how many total toothpicks were in each. One student said what numbers were multiplied to get the total number of toothpick but couldn’t figure out how to come up with how to represent those numbers. It wasn’t until I saw the data the student collected, that I recognized the pattern. Right before I could ask the group a question to get them on the right track, the student came up with the rule, before I had even developed it symbolically in my head. The Aha! moment! I had such a huge smile on my face! I asked to him to describe his reasoning to the rest of the group and told them I would be back to ask the others some questions about it.

After students worked on the problem for about an hour and 45 minutes, we did a whole-class share-out. As I walked around from group to group, I made mental notes of students who did things well and called on them to share with the class. Each group had someone who shared with the class explanations of their work methods, how they represented their data, what patterns they saw, how they expressed the rules symbolically, and so on. This was important because students had ownership of their work and were encouraged to present (informally) their thinking to the class, on only the second day of school! After the share out, I asked students to think about the ways they represented their data and what kinds of solution strategies they used to solving the problem. We had a whole-class discussion about this and one student was assigned as the scribe to record everything on easel paper. To conclude the class, I emphasized that these were all types of problem-solvingClassroom Wall strategies we would be using throughout the year. A couple of days later, I posted on the walls some problem-solving strategies (found on Pinterest) to use when working on math problems, most which students had used while working on the Toothpick Staircase problem.

I had presented a similar problem to my 10th graders in Springfield when I was student teaching and to my 8th graders last year. Both of those attempts to foster algebraic thinking kind of crashed and burned. The periods only lasted about 50, everything was rushed, and students wanted me to hold their hand through the problem, which I gave in to a little bit. This time around, I strictly limited my questioning to only probe and not guide, tried not to pick up a pencil, and had time to let the students work and do the problem justice. The period with this class lasted two and half hours, which made a huge difference. Students had time to make false starts, discuss the problem, and process what they had observed.

I’m going to use this problem again with my future 8th graders and make sure that I allow enough time to work on it. If the periods are shortened again, I’ll have to allot at least two or three class periods for this problem. Kids can really show you how brilliant they are if you give them a chance to. This was one of my best teaching moments to date!


First Day of School in Year Two

Wow, there are lots of changes being implemented at my school this year. They say your second year teaching is easier than your first but with all the restructuring that’s happening and lack of support for it, it seems like this year is going to be pretty challenging. One of the major changes is occurring in class scheduling. I am going from teaching five 48-minute periods to teaching three classes, all for different lengths in a given day of the cycle. The school is now following a long-block schedule, in which students have one class for 90 minutes during the lunch periods, five classes for the regular 48 minutes, and drop a class each day, which they then go to first in the next day of the cycle. This is the schedule that the high schools in the city follow. While the whole school follows the long-black schedule, the 7th and 8th grade math teachers also have students for double periods. For instance, my period B students are also my period C students, my period E are also my period F students, and my period D is a single block that comes to my class as they would to any other core academic class. This means that my B/C and E/F classes get twice as much instruction time with me than my D class. Most students in my D class get their second math class in a web-based math class which uses SuccessMaker.

Now, a discussion about the advantages and disadvantages to this new class organization for math could go in many different directions, but for the purposes of this blog I’ll focus on how my first day of school went with this new schedule. On the first day of this year, I saw my B/C class for two and a half hours straight (for double blocks and one of the blocks was a long block), my D class for 48 minutes, and my E/F class for 48 minutes (we dropped F that day in the cycle). I spent hours the day before school started trying to come up with some way to introduce my students to me, to each other, and to my math class in a two and a half hour class.

I didn’t want to start anything content-related on the first day of school, especially since the students (and I) were new to the very long class period, so I decided to introduce some instructional strategies that I would be use throughout the year while reviewing my syllabus and implementing some “getting to know you” activities and community builders.

I first asked students to participate in a Think-Pair-Share with the information they shared about themselves on an index card – their name, hometown, an activity they like to do, what they did over the summer, intended major, favorite food, book, superhero, or something else of their choice. Students wrote for five minutes, shared with a peer for two minutes, and shared out to their group, introducing the peer they learned about, which took about five minutes. I later gave out my syllabus, reviewed some key aspects and asked students to think about quotes I had scattered throughout the document. One of my favorites was by Sam Ewing; “Hard work spotlights the character of people. Some turn up their sleeves, some turn up their noses, and some don’t turn up at all.” Students thought about the quote independently, shared with a partner, listed examples or descriptions of the quote contents, and then discussed as a whole class. To teach students the rules in my class, the five Be’s – Be Prompt, Be Prepared, Be Productive, Be Polite, Be Positive – I asked the class to come up with examples of each and recorded them on chart paper so that each rule was clear and students knew what the expectations were for each one.

I learned a lot about my students through the community builder called Team Resume, which I detailed in May’s post “Getting to Know Our Students”.  This activity also allowed me to introduce to students the idea of roles in group work. I assigned the roles of recorder, reporter, timekeeper, and table manager in each group of four, reviewing each member’s responsibilities before students began. Students created a team resume about their group’s education, languages, interests, strengths (both academic and non-academic) and special talents. Each team then presented their resume to the class. To wrap up the first day with this group of students, we played That’s Me! Students who could relate to a statement I said raised their hand and said “That’s me!” It was a nice way to end class and students liked seeing who they had things in common with. The statements I used are below, but you can use whatever best suits your class, grade, and content!

That’s Me:

I like sports.

I enjoy reading.

I am a talented drawer.

I am athletic.

I am a singer.

I enjoy solving math problems.

I am a poet or song writer.

I speak 2 languages.

I speak 3 languages.

I am a good dancer.

I am good at math.

I wish we still had an extra week off for summer vacation.

I will come to math class everyday prepared and ready to learn.

Exploring Reflections Using Geoboards

I’ve used Geoboards for two lessons this year with my 8th graders and both of the lessons went really well!

I first used them to solve linear systems. The substitution method was really difficult for students to understand and after a couple lessons of feeling like I wasn’t making any progress, I decided to go back to the algebraic method later and teach them how to solve the system graphically, hoping that it would be easier for students since it’s more visual. However, graphing the system was more difficult for the students than I anticipated. When learning about linear functions a couple months prior, students struggled with graphing a line using the y-intercept and slope, and those struggles resurfaced again in the systems unit.

It was at this point that I decided to use the Geoboards. I modeled for students how to graph the lines (using pegs as points on a line and elastics to connect the points) and identify the solution to the system. Some students picked up on graphing the lines quickly while others took a bit longer to get the hang of it, but did eventually.

Students seemed to enjoy using the Geoboards and one confessed that it was easier to use them instead of using pen and paper to graph the system. It’s easier to correct a mistake on the Geoboards compared to doing so on a worksheet and it creates a memorable experience that students can refer back to.

I also used Geoboards as part of an exploratory activity in which students discovered the rules for reflecting a figure across the x-axis and y-axis. Students graphed given figures, reflected them, and recorded the vertices of their image. Students looked for patterns between the vertices in the pre-image and the image and wrote a rule for reflecting over the y-axis and a rule for reflecting over the x-axis. For students who finished early, there were extensions, which included writing the conjectures using arrow notation and writing a conjecture for reflecting over the line y = x.

Here are the lesson plan, activity sheet, answer key, exit ticket, and homework I used for this lesson. Exploring Reflections Using Geoboards

Getting To Know Our Students

One of the most informative and powerful homework assignments I gave this year asked students to write about their future goals and the role they think, if any, education will play in achieving these goals. A lot of students didn’t take the assignment too seriously and passed in a few sentences stating what profession they are interested in pursuing and why. However, several students wrote really thoughtful responses to the prompt. I learned some really personal things about my students that they were comfortable and willing to share in writing. One student of mine who described some difficult aspects of his home life brought me tears. I took the time to write some thoughtful comments and words or encouragement back to him. I felt a stronger connection with this student because he was so open and I was able to get to know him better. I am certainly giving this assignment next year in the beginning of the year and am considering having students respond to the prompt again at the end of the year and then revisit their original thinking to see if their views on their future or education has changed throughout the year.

In an RBT course I took this year, I learned about some great community builders that I am planning on implementing in my classes next year. The Team Résumé was one of them. In groups of five, we were given a piece of cardstock and markers to create a resume of the qualifications for teaching, talents, and interests of the people in our group. The requirements for the résumé’s content can certainly be adapted for most grade levels and can even be subject-specific. We also had to come up with a team name and the group’s reporter described our team to the class for a minute or two. It’s a quick way for students to get to know each other and find commonalities. It also gives teachers a sense of who their students are and what their students’ believe their strengths are.

A personal pre-assessment that I also discovered in this RBT course is called It’s All About Me, which includes two graphic organizers. The first is a descriptive graphic organizer in which the student’s name goes in the center of a web and coming out from the center are boxes that describe the student. Below this web is a cause/influence graphic organizer. The student’s name is off to the right side and to the left are boxes which provide the causes or reasons for the descriptions in the first organizer. After a few minutes, each person in the group shares the information in their It’s All About Me webs and elaborates on each part. I really enjoyed this activity, even as an adult student. I learned several things about my teammates’ backgrounds and their interests and was able to share a lot about my own culture and heritage.

My web included the following descriptions: Greek-American; bilingual, language lover; music, dance; traveling, learning about different cultures; family-oriented; sweet tooth; not a pet lover. In one of the first boxes in my cause graphic organizer, I wrote that my parents were born in Greece. This led to them speaking Greek at home and sending me to Greek school, which led to my love of languages and other cultures. Along with my Greek culture comes a strong sense of tradition and connection with family. My grandmother and father were great at dancing traditional Greek dances, which was passed down to me, fueling my love of dance and music. Pastries and sweets are a large part of Greek culture as well, which is partly why I have a big sweet tooth, besides the fact that my dad is the same way. Lastly, my mother was bit by a dog when she was young and has since had a fear of animals, which was instilled me (likely unintentionally), so I’m not much of a pet person. I had a goldfish when I was younger … it only lasted two weeks.

I hope you are able to implement some community builders in your classes. If you have any experiences or ideas about other ice-breakers or personal pre-assessments, please comment!

Tips For Teachers Without Their Own Classroom

As a first-year teacher in a middle school that is bursting at the seams, educating over 1200 students, I do not have my own classroom and have to travel to five different classrooms throughout the day. Although this is a major challenge for me, especially in the beginning of the year, I’ll spare you all of my whining and try to give some tips for anyone else in my kind of situation.

Some things that are helping me get by this year:

1. My cart is my life; I don’t go anywhere without it. On the top shelf (of three), I put anything that my students or I need easy access to. Inside a milk crate I put several hanging file folders, one for each of my classes, homework, classwork assignments, formative assessments, miscellaneous handouts, and extra paper. I use the class-specific folders for collected homework and graded work to be passed back. Next to that I have a little bin for pencil sharpeners and a pencil holder. Warning: it may be risky to leave a pencil bin full of pencil on our cart…the pencils tend to all disappear by the end of class and with my limited time I can’t be bothered to track them down. I can’t forget the essential tissue box alongside the bins.

On the middle shelf I keep a class set of calculators and whiteboards, which is pretty heavy so I take the whiteboards off on days that I’m not planning on using them. On the bottom shelf I have another milk crate full of supplies, like glue sticks, compasses, protractors, extra pencils, erasers, markers, colored pencils, scissors, and highlighters. I also carry a fan on that shelf; it gets very hot in some of the rooms I teach in. On one end of the cart is a little holder for folders where I put a box of rulers and write-up slips (unfortunately, I need those handy at times). As a side note, this cart can be deadly in the hallways for students that don’t walk fast enough during the two-minute transition periods.

2. Online stopwatch. Passing the hundreds of slow-walking students in the hallway, getting to the room in order to get the Do Now up on the SmartBoard, set up, and greet students at the door all before the bell rings is simply impossible, but I try my best. I often lose a few minutes at the beginning and end of each class in order to set up and then clean up my materials, so the 47-minute periods are more like 42-minute periods for me. Because I am so pressed for time, I time almost everything in order to frame my class and stay on schedule. The Do Now, mini check-for-understanding questions or problems, partner/group work, and exit ticket are all timed. I have the stopwatch displayed on the SmartBoard, this way, students and I both know how much time they have to complete the task and students can take responsibility for pacing themselves appropriately. When necessary, I extend the time.

3. USB Flash Drive. Along with my cart, my flash drive is essential. I keep it on my lanyard that holds my badge and keys. It is 64 GB and has on it the curriculum map for the district, any documents I need to print for homework, classwork, or handouts, and my daily lessons. I make a SmartBoard lesson for almost everyday of school. In general, the first slide of my lesson is the Do Now, followed by reminders or announcements, daily agenda with time allotments, daily objectives and standard, content slides, and wrap-up and homework slide. My days are always hectic and traveling sometimes makes me a bit flustered, so having these slides well-prepared everyday helps to remind me of my plan for each class and I’ll have them for next year! Make sure you safely eject the flash drive before yanking it out of the computer! I made the mistake of not doing this the other day and lost all of my files…sigh.

Interactive Ideas for Night of Excellence

The Night of Excellence at my school tonight was awesome! Families and teachers got to see what Breed’s students have been working on this year and it was great to see students excited about showing off their work. This night was separated by content and grade. Along with displaying student work, my eighth grade math department thought it was be fun to create some station activities in our area that students and family members could participate in.

Student Work Display (Tabletops)

Student Work

Here are some of the stations we had.

Beach Ball Equations: Toss the beach ball around and solve the equation on which your right thumb lands.

Beach Ball Equations

Integer Drop Zone: Try to get a zero sum with two ball drops.

Integer Drop Zone Integer Drop Zone _2

Tangrams: Use the tangram pieces to complete the picture.

Tangrams

Tower of Hanoi: Move the entire stack to another rod, obeying the following simple rules:

  1. Only one disk can be moved at a time.
  2. Each move consists of taking the upper disk from one of the stacks and placing it on top of another stack i.e. a disk can only be moved if it is the uppermost disk on a stack.
  3. No disk may be placed on top of a smaller disk.

Tower of Hanoi

Sierpinski Triangle: Use the model to create the Sierpinski Triangle.

Sierpinski Triangle

3-D Marshmallow Models: Use marshmallows and toothpicks to create you own three-dimensional shape.

3D Marshmellow Models 3D Marshmellow Models _2