The last time we talked about Android Studio, we learned about the layout of an Android app, and how different parts of the app are organized. You can find our previous discussion of Android Studio here. Now that we are familiar with using Android Studio and navigating around the guts of an Android app, let’s get started with making our first app.
When you open this project in Android Studio, open the file:
StudioProjects\MyFirstApp\app\src\main\res\layout\activity_my_first.xml
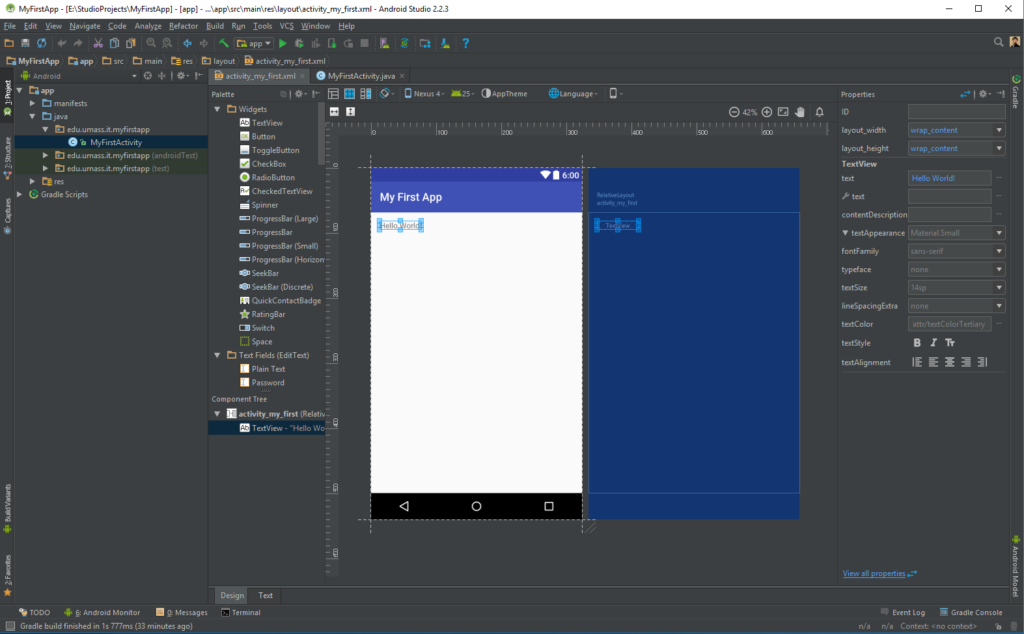
Your IDE should look like this:

You can see that to the left of the palette there is a long list of different elements you can put into your app. You can drag and drop these elements onto the palette and align them with other elements on the display. To the right there is a list of different properties that the currently selected element has.
What you see right now is not the complete list of properties of each element — you can see all of the properties by clicking on the blue “View all properties” link on the bottom of the properties pane. Any given element has dozens of properties, and in various contexts, a lot of them can have similar effects when edited. Trying out different elements and tinkering with their properties is a great way to familiarize yourself with the different ways you can manipulate elements.`
First, select the default “Hello World!” TextView element and delete it with the Delete key on your keyboard. We won’t be needing it for our app. Next, find the Plain Text EditText element in the Text Fields folder and drag it onto the palette. Take a look at the different ways that you can align the element, and once you’ve placed it drag the corner of the app display around to resize it and see how your app resizes to fit. You will find that depending on the way that you align the element, whether by aligning it with respect to other elements, centered vertically or horizontally, or by a certain number of pixels on the x/y axis, the element will scale to different resolutions differently. We will see how the alignment of an element is represented in code soon. It’s entirely up to you how you want to align your elements.
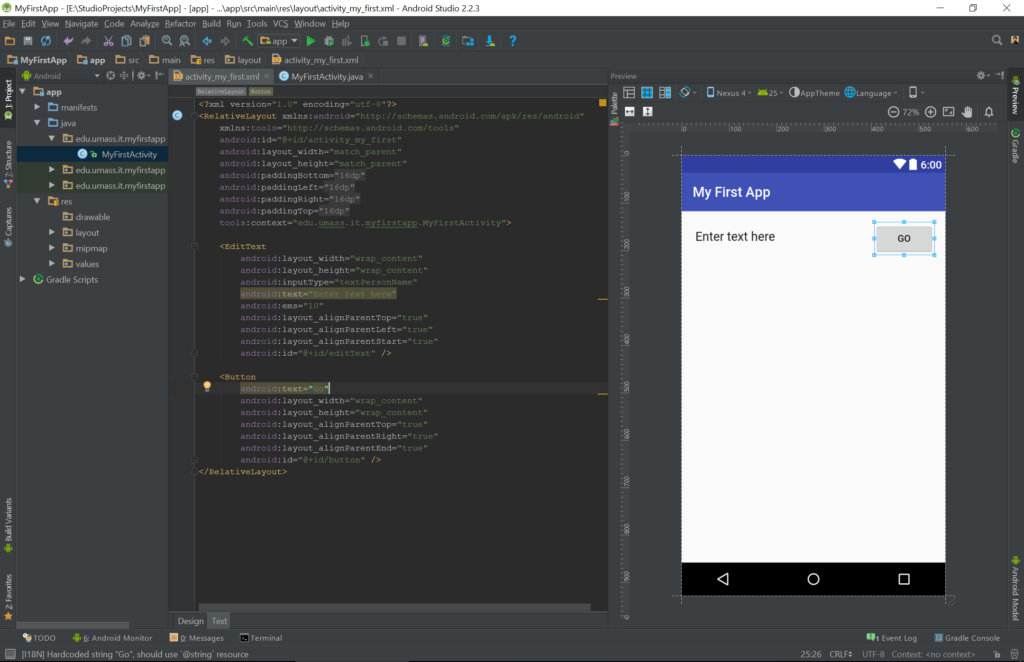
Placing an element on the palette adds code to the XML of that Activity. The XML directly defines what is shown on the palette. In fact, you can switch between seeing the palette and the raw XML with a single click — below the palette there are two tabs: Design and Text. You are currently on the Design tab. If you click on the Text tab, you will see the XML that defies this Activity. Each entity on the screen has its own block of code that consists of all of its uniquely defined properties. You may see the design of your Activity to the right of the XML as well. Changing the properties in the XML will directly affect the Activity design.
In the “<EditText … />” block that defines the EditText element you dragged and dropped onto the app, you will see a property called “android.text”. Go ahead and edit it to say:
android:text="Enter text here"
The EditText field will now change the text that it shows on the display to “Enter text here”.
Go back to the Design tab, find the Button under the Widget folder, and drag it onto the palette, aligned to the right of the EditText entity. If you look at the Properties list on the right while the Button is selected, you will see a property called “Text” under the TextView category which shows the same text that is written on the Button on-screen. Edit the text in the Text property to say “Go”. You may notice that the priorities are grouped under categories, such as Button and TextView. Android’s many various entities are simply Java classes that extend other classes and inherit their properties. The properties under Button are specific to the Button class, whereas the properties under TextView apply to any entity that extends the TextView class, which Button is one of. The EditText class also extends TextView, and you will see that EditText inherits the same properties from TextView that Button does. This is a classic example of the usage of object-oriented programming.
Go back to the Text tab and take a look at the new block of code that popped up for the Button you placed on the palette.

In the case that there are multiple Buttons or EditText fields on-screen, how do we know which one is which? We can’t just assume all entities are unique by their overall properties. In order for different entities on the app to communicate with each other properly, they need to be able to identify each other uniquely. That is why every single element has a unique ID.
If you are looking at the Design tab, you will find that the very first property on any element’s properties list is the ID. If you are looking at the Text tab, you will find that each element’s code block has a line that says “android.id” with a default value. Let’s rename the “Enter text here” EditText entity’s ID to be “edit_message”. That way we can refer to this exact EditText entity from anywhere in the app by its unique ID of “edit_message”.
So far we’ve placed an EditText field and a Button on the Activity and we’ve changed their Text properties (each of which is inherited from the TextView superclass), however neither of these entities do anything yet. Our goal is that when the user types in some text into the “Enter text here” field and presses the “Go” button, the app will show the text that the user typed full-screen. To do that, we need the Go button to trigger a new Activity, so that the text field and the button go away in favor of the full-screen text. To do that, we need to make a new Activity. Click on File > New > Activity > Empty Activity, name it “DisplayMessageActivity”, and click Finish. This will generate two new notable files: “DisplayMessageActivity.java” in your app’s “java” folder, and “activity_display_message.xml” in your app’s “res” folder. You should be aware now that the XML file defines the way the Activity looks and the Java file defines the things that the Activity does.
What is the bridge between the GUI and the executable code? Where is the bridge between XML and Java? How do you make an event on the screen trigger a response in the back-end code? Let’s find out.
Add the following line of code underneath the class declaration of your MyFirstActivity:
public final static String EXTRA_MESSAGE = "edu.umass.it.myfirstapp.MESSAGE";
and add this function underneath the premade onCreate() function:
/** Called when the user clicks the Send button */
public void sendMessage(View view) {
    Intent intent = new Intent(this, DisplayMessageActivity.class);
    EditText editText = (EditText) findViewById(R.id.edit_message);
    String message = editText.getText().toString();
    intent.putExtra(EXTRA_MESSAGE, message);
    startActivity(intent);
}
When the IDE highlights some of the text in red and complains that those classes aren’t imported, you can use the Alt+Enter keyboard command to automatically have the IDE import the appropriate classes into your code.
This function does a lot of things. Let’s deconstruct it line-by-line.
Intent intent = new Intent(this, DisplayMessageActivity.class);
Here we create a new instance of the class Intent. Essentially, all this class does is create Android’s way of declaring to the system that we are about to change Activities on-screen from “this” to “DisplayMessageActivity”.
EditText editText = (EditText) findViewById(R.id.edit_message);
Remember how we made a unique ID for the “Enter text here” TextEdit field on the original Activity? This is how we are retrieving it. We are using the “findViewById()” function to search through all of the things in the app that have IDs. The “R” is a very important class in Android that we’ve talked about in the previous blog post. It keeps a catalog of all the different entities, objects, and logistical bits that make up the program. We refer to IDs in the app using “R.id” and our “edit_message” ID is accessible here.
String message = editText.getText().toString();
Here we are simply fetching the text that the user inputted into the “editText” field.
intent.putExtra(EXTRA_MESSAGE, message);
This is where that seemingly random static string we placed at the top of the class earlier comes into play. It identifies to the system log where this event is coming from and exactly what it is. We attach the user’s input to the Intent.
startActivity(intent);
This is essentially the starting pistol. It tells Android to perform the changes that have been put into the Intent.
In the end, your MyFirstActivity.java class should look something like this:
package edu.umass.it.myfirstapp;

import android.content.Intent;
import android.support.v7.app.AppCompatActivity;
import android.os.Bundle;
import android.view.View;
import android.widget.EditText;

public class MyFirstActivity extends AppCompatActivity {
    public final static String EXTRA_MESSAGE = "edu.umass.it.myfirstapp.MESSAGE";

    @Override
    protected void onCreate(Bundle savedInstanceState) {
        super.onCreate(savedInstanceState);
        setContentView(R.layout.activity_my_first);
    }

    /** Called when the user clicks the Send button */
    public void sendMessage(View view) {
        Intent intent = new Intent(this, DisplayMessageActivity.class);
        EditText editText = (EditText) findViewById(R.id.edit_message);
        String message = editText.getText().toString();
        intent.putExtra(EXTRA_MESSAGE, message);
        startActivity(intent);
    }
}
So now how do we trigger this sendMessage() function? How do we complete that bridge between XML and Java? Go back to the “activity_my_first.xml” file and take a look at the Design tab. Click on the “Go” button and look at its Properties on the right. Under the Button properties you should see a property called “OnClick” with a dropdown menu. What will you find under that dropdown menu? The “sendMessage (MyFirstActivity)” function! Now whenever the “Go” button is clicked, the XML will trigger that function.
We’re almost done. All we need to do now is tell the DisplayMessageActivity class what to do. Go to that class and you will find an “onCreate()” function. This is sort of like a pseudo-constructor for the Activity. The code here is executed before the Activity is shown on-screen. It’s used to prepare the Activity for presentation. Inside the function and after the two lines of code that are already there, add the following code:
Intent intent = getIntent();
String message = intent.getStringExtra(MyFirstActivity.EXTRA_MESSAGE);
TextView textView = new TextView(this);
textView.setTextSize(40);
textView.setText(message);

ViewGroup layout = (ViewGroup) findViewById(R.id.activity_display_message);
layout.addView(textView);
Again, use Alt-Enter to fix all of the missing imports. Most of the code here is pretty self-explanatory. Essentially, we fetch the Intent instance that created this Activity, retrieve the user’s text input that we fed to the Intent, then we create a new TextView instance in Java code (bypassing the XML creation), give it a couple properties such as textSize and text to show, then we retrieve the ViewGroup (an abstraction of the Activity’s display on-screen) and place the new TextView into it with standard alignment.
Congratulations! Our app is done. Go ahead and build the app and run it in your Android Virtual Device or on your physical Android device. We will learn how to do some more advanced stuff next time, like adding a custom icon to our app and putting images on the app.
